Petal Bloom
A blooming center surrounded by large loops into which you work mini loops! Two sets of spaces through which to attach other flowers, and a little middle flower can be added to finish off.

|
|
Stitches
sc (UK dc)
hdc (UK htr)
dc (UK tr)
Petal Bloom Pattern
Round 1 - Padding Stitches: this round forms a base over which we will work the stitches in Round 2.
Work this first round around
the starting tail end to weave it in as you go; then you can snip that
tail end off before you start Round 2 and it won't distract you :)
So: Ch 6, ss into 6th ch from hook to make a ring; ch 1, 14 hdc into ring, ss into 1st hdc to join.
Round 2 - Covering Stitches: In this round you crochet into the center of the ring, completely covering the sts from Round 1. This means you'll be making longer sts, so do allow your yarn to tell you how loose to work, bearing in mind that you want your sts looking smooth and neat.
I recommend you SM the 2nd dc of Round 2 as you will join into it at the end.
Ch 1, 25 dc into center of ring, working over the hdc sts of Round 1.
Here we are starting the round and stitch marking the second stitch:
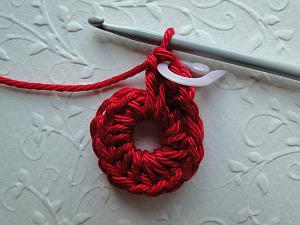
Now ss into 2nd dc to join (which we stitch marked.)
Here's the end of Round 2:
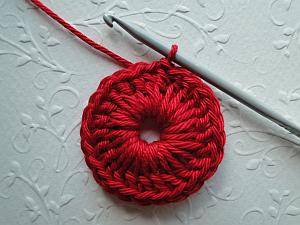
You can now SM that joining ss you just made to spot the place to join for the end of Round 3!
Round 3 - Large Loops: ch 7, skip the stitch you joined into, skip next 3 sts, ss into next st.
(Ch 7, skip next 3 sts, ss next st) 5 times, working your final ss into the joining ss from the last round (stitch marked.)
And this is the end of Round 3:
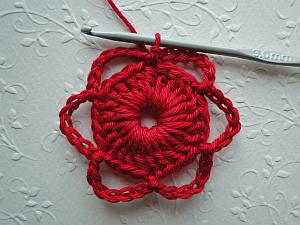
Round 4 - Mini Loops: *sc into next loop; (ch 3, sc) 3 times into same loop*
Repeat from * to * 5 times; ss into 1st sc of 1st loop.
Tie off; weave end through the back loop of the stitch you joined into, then weave carefully down the back of the piece and around the center.
~~~~~
- Home
- Crochet Flower Combos Part 4
- Petal Bloom