How to Crochet Bullion Stitch :)
Learn how to crochet bullion stitch with my step by step tutorial and videos!
It takes time and practice to produce even-looking bullions, but it's well worth it. Once you've mastered them you can try making my Bullion Stitch Flower :)
|
|
Basic Bullion Stitch with 5 Wraps
A video is worth a billion words ;) So let me show you how I work a bullion with 5 wraps around the hook first:
You can try working bullions into a chain - but it's nice to have a good, solid base to work into if you're just starting out on this journey!
So let's work our bullion stitches onto a base of dc (UK tr.)
I'm using sports-weight cotton and my favorite 3 mm hook for this tutorial.
Ch 16, dc (UK tr) into 4th ch from hook, dc (UK tr) into each ch along.
Ch 3, turn. Miss first st, dc (UK tr) into each st along.
Ch 4, turn.
Now we are on the right side of the work. Bullion stitch has a right side and a wrong side, so we'll be working into the right side :)
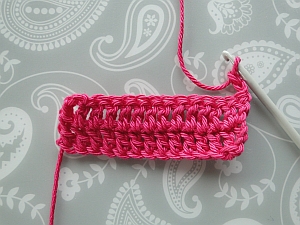 Two rows of stitches made for the base, right side now facing us.
~~~~~
Step 1: Wrap yarn around hook 5 times.
I hold each wrap with my right index finger to keep it on the hook as I go.
Keep your loops relaxed - not too loose or hanging off the hook. Not too tight, either!
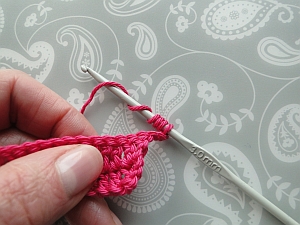 Five wraps made around the hook, plus our original loop = 6 loops total
~~~~~
Step 2: Miss 1st stitch, insert hook into 2nd st, pull through a loop.
Now is the time to tighten that loop under the hook - it's almost hiding under there!
Move your wraps up towards the top of the hook:
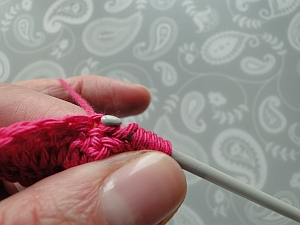 Tightening the very top loop you just pulled through so that it will go more easily under the other loops.
Top tips for this crucial step!
What you're aiming for here is to ensure the first wrap you go under is a little looser than the others
If you can pull your tightened loop under your hook comfortably under the first wrap, then you should be able to get it through the rest.
If you need to loosen that first wrap a bit, "stroke" the wraps from back to front to work a bit more looseness into the first one. You can see how I do this in the video.
If your wraps are too tight, undo and try again. I had to do this a lot when I started, and I still do from time to time.
Work loosely
When making your wraps, inserting your hook into the next stitch, and pulling through your loop, keep your tension nice and relaxed. Only after you've pulled through your loop do you surprise your bullion and tighten the loop you pulled through under your hook.
Keep the top of the hook straight
You shouldn't have to wiggle your hook around or twist it. Keep it pointing upwards.
Hold the wrapped stitches between your thumb and index fingers.
This keeps them together and under control. Things get a bit more difficult if you have a greater number of wraps, but if you can cope with 5 wraps, this is good training for what is to come.
Play around with those wraps. Move them about a bit. See what happens if you move them one way or another. You'll soon have them behaving themselves!
~~~~~
Step 3: Pull the tightened loop under your hook through all five wraps and the original loop on the hook:
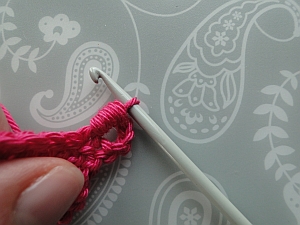 Yarn pulled through all wraps and final loop on hook
~~~~~
Step 4: Ch 1 to secure bullion.
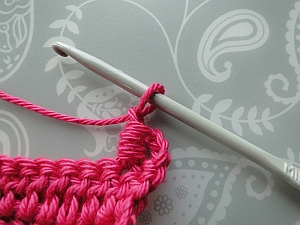 A bullion with 1 ch worked
Repeat steps 1 - 4 along your piece to practise.
How to Crochet Bullion Stitch with 12 Wraps
The method above works with more wraps. Try 6 or 7 wraps and so on, and build up.
If you're feeling really adventurous, move on to 12 wraps!
Begin as above with a base for your work and chain 5 to turn.
Why only ch 5? Well, although you'll have 12 wraps, you want them to be nice and close together to create a super-looking bullion! If you made 6 or 7 chain (as I tried doing) you end up having to pull the yarn up through the bullion at the end to get it to the correct height. And then your bullion looks rather stretched and out of shape... or at least, mine did!
OK, watch how I work two bullions wrapping the yarn around the hook 12 times:
Different Types of Bullion Stitch
You may have noticed another method of crocheting bullions.
One of the most common I've seen is to wrap the yarn around the hook several times, insert your hook into the next stitch, pull through a loop, yarn around hook again, draw through all the loops, then ch 1. So this version involves an extra "yarn around hook."
This also works well - it just depends on how you prefer to crochet the stitch.
Bullion Treble Stitch
I found this stitch in Therese de Dillmont's Encyclopedia of Needlework, which is written for UK readers - so in US terminology, I guess this would be Bullion Double Stitch!
In some editions of this book, Dillmont seems to refer to a bullion treble as being simply a stitch with 10 or 12 wraps. In my edition, she adds a further sentence, telling us to pull the yarn through all but one of the loops on the hook and then pulling a new loop through the last two loops on the hook. So this is the one I will explain here.
Make a base for your stitches again as above, chaining 5 to turn - or do as I did, and work into any number of loosely worked chain, allowing 5 ch for the turn.
*Wrap your yarn 12 times around the hook.
If working on a base: miss 1st st, insert hook into next st and pull through a loop.
If working on a chain: insert hook into 6th ch from hook and pull through a loop.
Then tighten the loop under your hook and pull it through all
of the loops on your hook apart from the last one so that you are left with two loops on your hook.
Then yarn around hook and pull through final two loops.*
No need to make a chain stitch - just repeat from * to *.
This is what I ended up with:
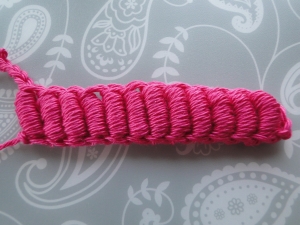 Bullion trebles worked into a chain
Let's compare that to a 12 wrap bullion worked "normally" - ie pulling your tightened loop through all the wraps and final loop in one go and then making 1 ch:
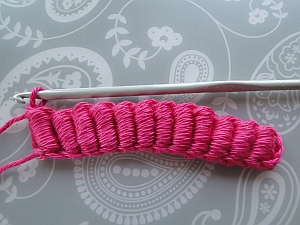 Regular bullions worked into a chain
Not a lot of difference it would seem... until you look at the top of the stitch:
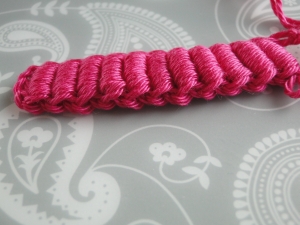 An "interesting" stitch definiton on the top of the "normally" worked bullion
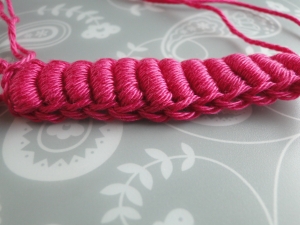 Very nice two-loop definition on the top of the treble bullion!
If I was going to be working a second row, I'd rather work into the treble bullion on the right, wouldn't you?
I guess the difference is explained by the fact that the regular bullions are finished off with 1 ch, and the treble bullions don't need that extra chain at the end.
So I tried working a swatch to see what came out if I worked rows of bullions, each row separated by a row of sc (UK dc.)
For the chain: I chained 12, working the chains even looser than I did before - because as you can see from the pix above, I didn't work loosely enough and my row of bullions curled a little.
Then I chained 5 for the turn, working those chains with a tighter tension.
Row 1: Treble bullion into 6th ch from hook, treble bullion into each chain along.
Ch 2, turn.
Row 2: Work 1 sc (UK dc) into the top two loops of 1st bullion and into each st along.
Ch 5, turn.
Row 3: Treble bullion into 1st st and into each stitch along.
Ch 2, turn.
Then repeat rows 2 and 3 and this is what we get:
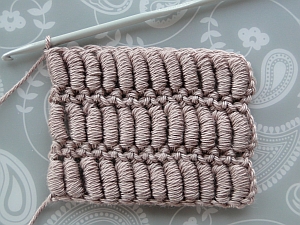 Bullion trebles worked into a chain alternating with rows of sc (UK dc)
Well - that was certainly an interesting experiment! I'm sure there are many more adventures to come with our bullions.
And I do hope this page will help you learn how to crochet bullion stitch successfully :)
~~~~~