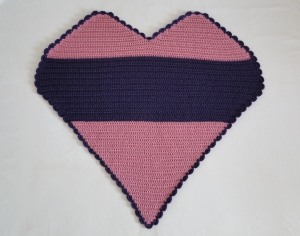
Heart Baby Blanket Pattern
Crochet a beautifully shaped heart baby blanket for that special bundle... or special someone... in your life!
|
|
The main piece is worked from the bottom towards the top in dc (UK = tr) and the shell edging is added at the end.
Yarn: Aran weight 100% acrylic.
For this piece, I used Alize Burcum "Klasik" 100g/3.53oz, 210m/230yds per ball - 2 balls of pink, 2 balls of purple.
I used about a ball and a half of each color of yarn.
Hook: 5.00mm, US H8
Measurements: If you think of the blanket fitting into a rectangle, the height is 84cm/33" from top to bottom, and the width is 89cm/35" across at the widest point.
I love the bold stripe - but you could crochet this in one color, or use one color for the main part with a contrasting color for the edging.
See how I got on with my stripeless heart blanket, if you like!
Rows 1 - 58: the main body of the heart
With color A, ch 4. Leave a long tail end for weaving in later.
4 dc into 4th chain from hook. (Stitch count = 5 stitches.)
Here's the first row before turning.
Your 4th chain from hook becomes the bottom point of your blanket.
The three other chain count as 1 dc. Add your 4 dc, and you have 5 stitches.
The right side of the blanket is now facing us.
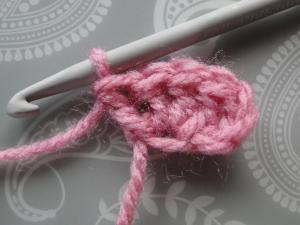
Ch 3 and turn.
NB: The turning chain in this pattern is 3 ch, which counts as 1 dc throughout. So, when you work into the last stitch of a row, that stitch will usually be a turning chain from a previous row.
Row 2: 1 dc into 1st stitch (your 1st stitch is the top of the last stitch you made in the previous row and sits below the base of your turning chain,) 1 dc into each of next 3 stitches, 2 dc into last stitch. (7 stitches.)
NB: When working into the last stitch which is made up of a turning chain, I work into the middle chain of that last stitch (the second chain) and not into the top of the three chain. Working into the middle chain is a lot easier and works well with this pattern.
I've put a stitch marker into the middle chain of the 3 ch turn from the first row:
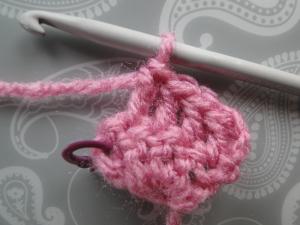
Here's the completed second row:
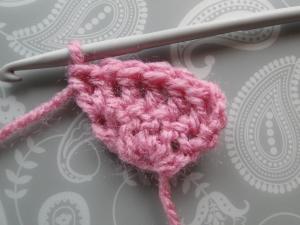
Ch 3, turn.
Row 3: 1 dc into 1st stitch, 1 dc into each stitch along, finishing with 2 dc into last stitch. (9 stitches.)
Ch 3, turn.
Rows 4 - 7: Repeat row 3.
The stitch count should be:
Row 4: 11 stitches.
Row 5: 13 stitches.
Row 6: 15 stitches.
Row 7: 17 stitches.
Remember: your turning chain counts as a stitch.
Row 8: 2 dc into 1st stitch, 1 dc into each stitch along, finishing with 3 dc into last stitch. (21 stitches, row increased by 4 stitches.)
Ch 3, turn.
Row 9: 1 dc into 1st stitch, 1 dc into each stitch along, finishing with 2 dc into last stitch. (23 stitches, row increased by 2 stitches.)
Ch 3, turn.
For rows 10 - 42 we repeat rows 8 and 9.
Ready? Off we go and...
Remember to ch 3 and turn at the end of each of the following rows!
Row 10: 2 dc into 1st stitch, dc along, 3 dc into last stitch - 27 stitches.
Row 11: 1 dc into 1st stitch, dc along, 2 dc into last stitch - 29 stitches.
Row 12: 2 dc into 1st stitch, dc along, 3 dc into last stitch - 33 stitches.
Row 13: 1 dc into 1st stitch, dc along, 2 dc into last stitch - 35 stitches.
Row 14: 2 dc into 1st stitch, dc along, 3 dc into last stitch - 39 stitches.
Row 15: 1 dc into 1st stitch, dc along, 2 dc into last stitch - 41 stitches.
Row 16: 2 dc into 1st stitch, dc along, 3 dc into last stitch - 45 stitches.
Row 17: 1 dc into 1st stitch, dc along, 2 dc into last stitch - 47 stitches.
Row 18: 2 dc into 1st stitch, dc along, 3 dc into last stitch - 51 stitches.
Row 19: 1 dc into 1st stitch, dc along, 2 dc into last stitch - 53 stitches.
Row 20: 2 dc into 1st stitch, dc along, 3 dc into last stitch - 57 stitches.
Row 21: 1 dc into 1st stitch, dc along, 2 dc into last stitch - 59 stitches.
Row 22: 2 dc into 1st stitch, dc along, 3 dc into last stitch - 63 stitches.
Row 23: 1 dc into 1st stitch, dc along, 2 dc into last stitch - 65 stitches.
Row 24: 2 dc into 1st stitch, dc along, 3 dc into last stitch - 69 stitches.
Row 25: 1 dc into 1st stitch, dc along, 2 dc into last stitch - 71 stitches.
Row 26: 2 dc into 1st stitch, dc along, 3 dc into last stitch - 75 stitches.
Row 27: 1 dc into 1st stitch, dc along, 2 dc into last stitch - 77 stitches.
Row 28: 2 dc into 1st stitch, dc along, 3 dc into last stitch - 81 stitches.
Row 29: 1 dc into 1st stitch, dc along, 2 dc into last stitch - 83 stitches.
Row 30: 2 dc into 1st stitch, dc along, 3 dc into last stitch - 87 stitches.
Here are the first 30 rows:
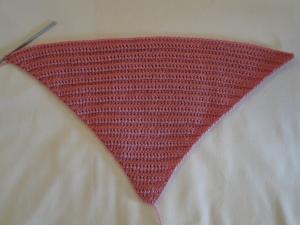
I chose to change to color B at the end of row 30, so starting row 31 with my new color. I change back to color A at the end of row 52.
Here's how to change color:
Work the last dc until you have 2 loops on your hook:
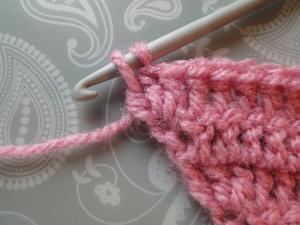
Pull through your new color:
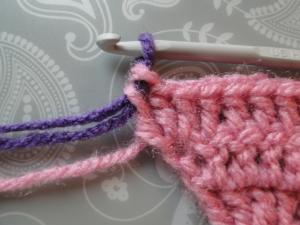
Work your 3 turning chain:
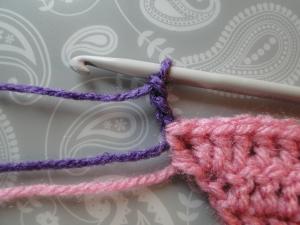
Turn your work and keep crocheting on!
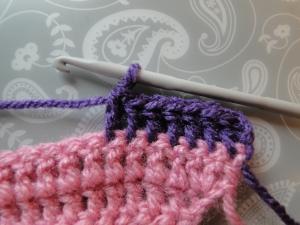
You can change color wherever you like! My only advice is to be consistent about changing either at the end of even or at the end of odd-numbered rows. This will give your finished blanket a much neater appearance. I prefer the look of the change at the end of an even-numbered row :)
Let's continue, remembering your ch 3 turn at the end of every row:
Row 31: 1 dc into 1st stitch, dc along, 2 dc into last stitch - 89 stitches.
Row 32: 2 dc into 1st stitch, dc along, 3 dc into last stitch - 93 stitches.
Row 33: 1 dc into 1st stitch, dc along, 2 dc into last stitch - 95 stitches.
Row 34: 2 dc into 1st stitch, dc along, 3 dc into last stitch - 99 stitches.
Row 35: 1 dc into 1st stitch, dc along, 2 dc into last stitch - 101 stitches.
Row 36: 2 dc into 1st stitch, dc along, 3 dc into last stitch - 105 stitches.
Row 37: 1 dc into 1st stitch, dc along, 2 dc into last stitch - 107 stitches.
Row 38: 2 dc into 1st stitch, dc along, 3 dc into last stitch - 111 stitches.
Row 39: 1 dc into 1st stitch, dc along, 2 dc into last stitch - 113 stitches.
Row 40: 2 dc into 1st stitch, dc along, 3 dc into last stitch - 117 stitches.
Row 41: 1 dc into 1st stitch, dc along, 2 dc into last stitch - 119 stitches.
Row 42: 2 dc into 1st stitch, dc along, 3 dc into last stitch - 123 stitches.
Now we're going to work three rows with no increase.
Rows 43 - 45: Miss 1st stitch, 1 dc in each stitch to end. (No increase, 123 stitches.)
Ch 3, turn.
The decreases start in the next row. We will be double crocheting two together - dc2tog. Here's how to do it:
After your ch 3 and turn into row 46, miss first stitch.
Dc into the next stitch until you have 2 loops left on your hook:
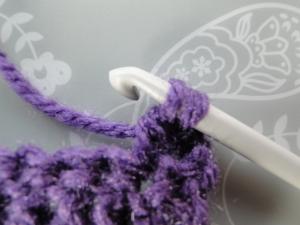
Dc into the next stitch until you have 3 loops left on your hook:
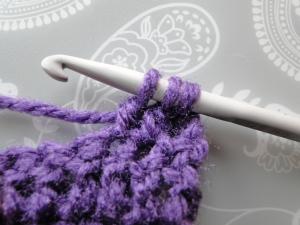
Yarn over hook, pull through all 3 loops on hook.
Two stitches completed: turning chain and one dc2tog:
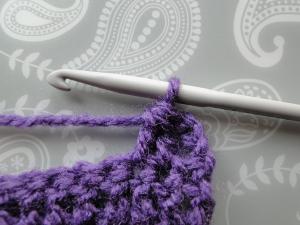
Ok, here we go with row 46, where you will decrease at the beginning and the end of the row:
Row 46: Miss 1st stitch, dc2tog, 1 dc in each stitch along until last two stitches where you will dc2tog. (121 stitches, row decreased by 2 stitches.)
Ch 3, turn.
Rows 47 - 48: Miss 1st stitch, 1 dc in each stitch along. (121 stitches.)
Ch 3, turn.
Row 49: Miss 1st stitch, dc2tog, 1 dc in each stitch along until last two stitches where you will dc2tog. (119 stitches, row decreased by 2 stitches.)
Ch 3, turn.
Rows 50 - 51: Miss 1st stitch, 1 dc in each stitch along. (119 stitches.)
Ch 3, turn.
Row 52: Miss 1st stitch, dc2tog, 1 dc in each stitch along until last two stitches where you will dc2tog. (117 stitches, row decreased by 2 stitches.)
Change to color A at end of this row by pulling your new color through the last three loops of your dc2tog.
Ch 3, turn.
Row 53: Miss 1st stitch, 1 dc in each stitch along. (117 stitches.)
Ch 3, turn.
Row 54: Miss 1st stitch, dc2tog, 1 dc in each stitch along until last two stitches where you will dc2tog. (115 stitches, row decreased by 2 stitches.)
Ch 3, turn.
Row 55: Miss 1st stitch, dc2tog, 1 dc in each stitch along until last two stitches where you will dc2tog. (113 stitches, row decreased by 2 stitches.)
Ch 3, turn.
In our next row we will (dc2tog) twice. Here's how :
After your ch 3 turn, miss 1st stitch, and dc2tog:
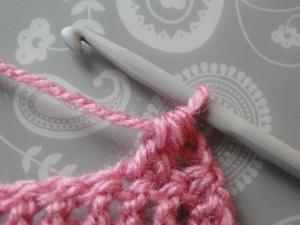
Then work a second dc2tog next to the first. Three stitches completed: turning chain plus (dc2tog) twice.
At the end of the row, you'll (dc2tog) twice again!
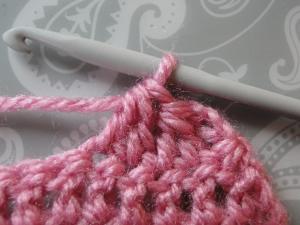
Row 56: Miss 1st stitch, (dc2tog) twice, 1 dc into each of next 104 stitches, (dc2tog) twice. (109 stitches, row decreased by 4 stitches.)
Ch 3, turn.
Row 57: Miss 1st stitch, (dc2tog) twice, 1 dc into each of next 100 stitches, (dc2tog) twice. (105 stitches, row decreased by 4 stitches.)
Ch 3, turn
Row 58: Miss 1st stitch, 1 dc in each stitch along. (105 stitches.)
Ch 3, turn.
Rows 59 - 70: the right hand side of the top of your heart
Row 59: Miss 1st stitch at base of 3 ch turn, (dc2tog) twice, 1 dc into each of next 47 stitches. (50 stitches.)
Place a stitch marker into the next stitch. The stitch marker marks the center stitch which separates the two top parts of the heart. You will not crochet into it until you come to do the shell edging.
Row 59 of right hand side: a bird's eye view:
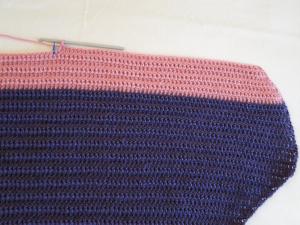
Row 59 of right hand side: the close up :)
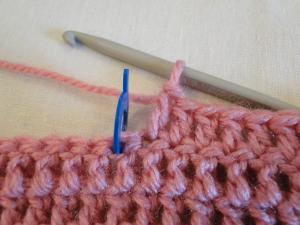
Then... Ch 3, and turn!
Now we decrease by 4 stitches each row.
Row 60: Miss 1st stitch, (dc2 tog) twice, 1 dc into each of next 41 stitches, (dc2tog) twice. (46 stitches.) Ch 3, turn.
Row 61: Miss 1st stitch, (dc2 tog) twice, 1 dc into each of next 37 stitches, (dc2tog) twice. (42 stitches.) Ch 3, turn.
Row 62: Miss 1st stitch, (dc2 tog) twice, 1 dc into each of next 33 stitches, (dc2tog) twice. (38 stitches.) Ch 3, turn.
Row 63: Miss 1st stitch, (dc2 tog) twice, 1 dc into each of next 29 stitches, (dc2tog) twice. (34 stitches.) Ch 3, turn.
Row 64: Miss 1st stitch, (dc2 tog) twice, 1 dc into each of next 25 stitches, (dc2tog) twice. (30 stitches.) Ch 3, turn.
Row 65: Miss 1st stitch, (dc2 tog) twice, 1 dc into each of next 21 stitches, (dc2tog) twice. (26 stitches.) Ch 3, turn.
Row 66: Miss 1st stitch, (dc2 tog) twice, 1 dc into each of next 17 stitches, (dc2tog) twice. (22 stitches.) Ch 3, turn.
Row 67: Miss 1st stitch, (dc2 tog) twice, 1 dc into each of next 13 stitches, (dc2tog) twice. (18 stitches.) Ch 3, turn.
Row 68: Miss 1st stitch, (dc2 tog) twice, 1 dc into each of next 9 stitches, (dc2tog) twice. (14 stitches.) Ch 3, turn.
Row 69: Miss 1st stitch, (dc2 tog) twice, 1 dc into each of next 5 stitches, (dc2tog) twice. (10 stitches.) Ch 3, turn.
Row 70: Miss 1st stitch, (dc2 tog) twice, 1 dc into next stitch, (dc2tog) twice. (6 stitches.)
Now work a ss into the space between the last two "posts" or "legs" of the dc2tog just worked. Tie off, leaving a long end for weaving in.
Turn your work so that the right side of the work is facing you.
Place a stitch marker in between the legs of the dc2tog where you made your slip stitch.
Place another stitch marker in the space made by your 3 ch turn on the other edge of the row.
The stitch markers will help you see exactly where to work when we come to do the shell edging - the picture below shows you the view from the right side:
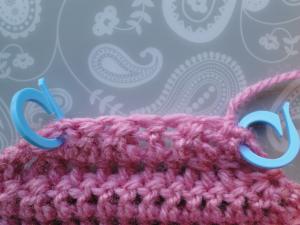
The marker on the right goes in the space where you'll make your last shell on this side of the heart.
The marker on the left shows you where you'll make the first shell going down the left!
You'll see five stitches running along the top (not including your slip stitch or 3 ch turn) - two dc2tog stitches, one dc in the middle all by itself, and another two dc2tog stitches - and I'll tell you how to work your shells around these when we come to the edging.
Rows 59 - 70: left hand side of top of heart
With the right side of your blanket facing you, join thread into the stitch to the left of your stitch marker.
Leave a nice long tail end for weaving in later - my preference is to weave this end all along the back of the row to the very left hand edge, where I'll work it securely into the shells there, rather than weaving it behind the center shells around this part of the blanket.
Row 59: Ch 3, miss 1st stitch at base of 3 chain just made, 1 dc into each of next 47 stitches, (dc2tog) twice. (50 stitches.)
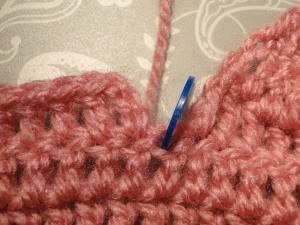
Starting row 59. In the stitch to the left of the stitch marker, we chain 3, then start the dc in the next stitch.
Ch 3, turn.
Rows 60 - 70: Repeat rows 60 - 70 above.
Turn your work so the right side is facing you.
Place stitch markers into the sides of row 70 just like you did above.
Now you're all set up to whizz around the edges!
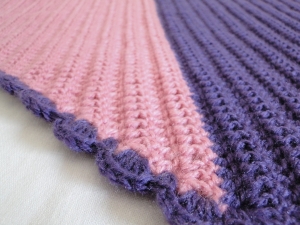
Now for the fun bit: the heart baby blanket's shell edging!
We're going to work into the spaces on each side of the rows - up one side, down and up the top middle of the heart, and down the other side.
The edging is a repeat pattern of 2 sc (UK = dc) worked into the edge of a row, followed by a shell of 5 dc (UK = tr) into the edge of the next row.
Once you get going, it's easy, and this is my favorite part of the whole project! Here we go:
With the right side facing you, join color B into the space in the right hand edge of 1st row.
Ch 1. Work 2 sc into same space.
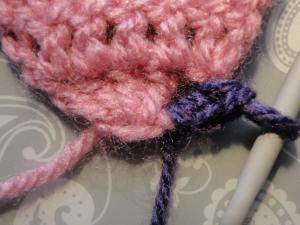
Work 5 dc into the next space at the edge of 2nd row to make a shell.
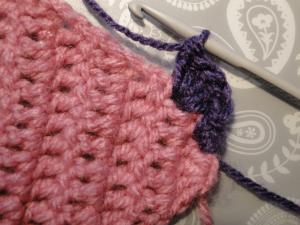
Continue along the edge, working 2 sc into the edge of row 3, 5 dc into the edge of row 4, and so on.
When you work your shell into to the top of the right corner edge of the heart (where we placed a stitch marker,) you should have 35 shells, each separated by 2 sc.
Working along the top edge of the heart on the right:
Remember - there are five stitches running along this top edge. Work 2 sc into the first stitch, miss next stitch, 5 dc in next stitch (which was our lonely dc in the middle,) miss next stitch, 2 sc in next stitch.
Then work 5 dc into the next space on the corner, which is the space you made by your three turning chain for the last row.
(37 shells made.)
Here's where we are:
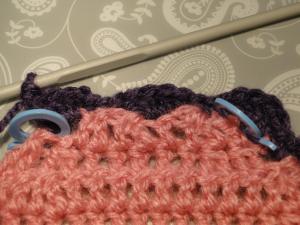
Down we go towards the center stitch marker:
Continue down that side of the heart, working 2 sc into the edge of the next row, 5 dc into the next row's edge and down until you end up with 2 sc in the row above the stitch marker.
You should have 42 shells worked at this point.
Work 5 dc into the center stitch where your stitch marker sits. (43rd shell.)
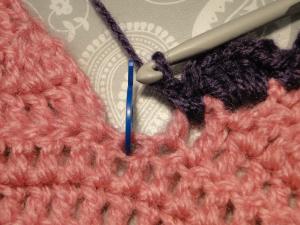
Up from the center stitch:
Work 2 sc into the next edge space of the row above, then 5 dc into the next space, repeating up to the corner with your stitch marker where you work your 5 dc.(49 shells.)
Here's the middle stitch sitting nice and tidy:
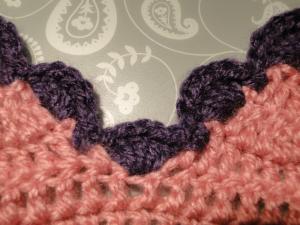
Along the top left hand edge:
Just as before: 2 sc into first stitch, miss next stitch, 5 dc in next stitch, miss next stitch, 2 sc in next stitch. (50 shells.)
Around the corner and down to the bottom!
5 dc into the corner space where your last stitch marker sits, 2 sc into the next edge space, and repeat all the way down to the bottom until you finish with 2 sc in the side of the first row. (85 shells.)
In the pic below, you can see the last 2 sc in the side of row one.
The very first chain you made at the start of the pattern is there at the top, just waiting to be filled with a shell!
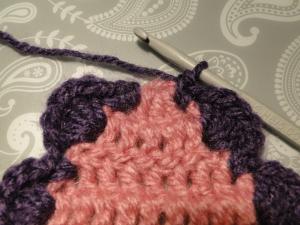
Finish with 5 dc in that first chain you crocheted, then join with a slip stitch into the beginning sc of your edging.
(86 shells in total.)
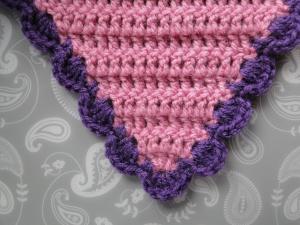
Weave that last end through the back loop of the 2nd sc to the back, then weave it up and down the back of the shells and single crochets until it is firmly woven in.
Weave in all other ends.
~~~~~
- Home
- Crochet Blankets
- Heart Baby Blanket
