The Chainlace Bracelet
This easy crochet bracelet looks great just with a button, but if you'd like to add beads, the effect is simply stunning:


|
|
Above - bracelets worked in 100% cotton sport weight with a 3mm hook, Below - thread weight cotton yarn, with a 2mm hook.
The pattern is worked in one piece, starting at the button end and working up to the button loop end.
If you're in a hurry, or have a lot of simple bracelets to work up in a short amount of time, you can omit the button and its loop and just work the basic piece, sewing the two ends together:

The nature of the lacy chain pattern allows the bracelet to stretch comfortably enough for you to slip it over your hand and onto your wrist, still allowing for a fairly snug fit.
Chainlace bracelet photo tutorial
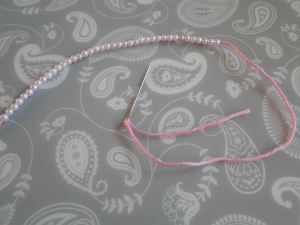
If using beads, thread your beads onto the yarn. I used 36 beads, working with sport weight yarn and a 3mm hook. My wrist measurement is 6 inches or 15cm.
If you're not sure how many beads
you'll need, work up the version without beads first. Then you can count
the stitches to see how many you're likely to need.
Then work from Step 1 below - you will start adding beads during Step 3.
~~~~~
Step 1: Make a slip knot, leaving a long enough tail end to sew your button onto this end.
ch 7, ss into 7th chain from hook:
 7 chain loop.
~~~~~
Step 2: ch 5, turn, ss into 7 chain space just below:
 Hook into 7-chain loop.
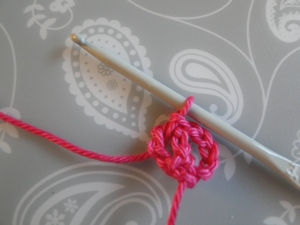 Slip stitch completed.
~~~~~
Tip: Keep your chain stitches nice and even. Work the slip stitch towards the far end of the space below so that it's sitting in just the right place for the turn coming up.
~~~~~
Step 3 - without beads:
*ch 5, turn, ss into 5 chain space* Repeat from * to * for pattern:
 Working the loops.
~~~~~
Step 3 - with beads:
ch 5, turn, ss into 5 chain space (just as in the picture above for those working without beads.)
You've now made the end of the bracelet where you'll sew on your button.
*move bead up to work, ch 1 to secure bead, ch 4, turn, ss into five chain space*
Repeat from * to * for pattern:
 Move bead up to work.
 Chain 1 to secure.
 Chain 4, turn; ss into 5-ch space.
~~~~~
Step 4: Check the fit!
 Checking the fit.
Working with my cotton, the two ends can just touch each other when I put them together.
The chains give the bracelet some stretch, so if you're in doubt, it's best to be a tiny bit shorter rather than a tiny bit longer here :)
We'll put the button loop on next, which will give a bit of extra length.
~~~~~
Step 5: Work the number of chain you need to make a loop big enough for your button to fit through.
If beading, start with a bead and one chain just like before.
Then, for everybody:
turn
sc (UK dc), ss into the five chain loop.
Check the button fits through your loop!
All OK? Then tie off and weave in the end.
A 7 chain loop worked for this flowery button:

Only 5 chain for this button. The last bead is on the top right, then I worked my 5 chain, then sc (UK dc) and a slip stitch into the space below:

~~~~~
Step 6: Weave your tail end at the beginning of your bracelet to the place where you'll sew on your button.
Attach the button and weave the tail end into the back of your bracelet:


Don't pull the yarn too tight, and sew your button on neatly so that the holes of the button are aligned with the bracelet:

Then... settle down with your crochet books and printouts, have a cup of tea, a slice of cake - and enjoy wearing your bracelets!
Don't forget to join me on Facebook - see you there!
~~~~~
- Home
- Crochet Jewelry
- Chainlace Bracelet