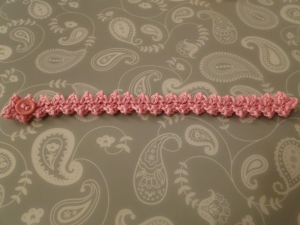
The Buttonbraid Bracelet
Work along one side of a chain... down the other side... pop on a button - and you're done!
The bracelets in the top two pix are worked with sport weight yarn and a 3 mm hook.


Or feature a favorite button on a thread weight yarn as I have done here:

|
|
~~~~~
For those of you wanting to work this pattern only as a braid, you can omit the button and the button loop and simply work this up as a braided edging or bookmark.
Work Step 1, then turn to work down the other side of your braid - here's how:
Skip the triangle you just made, and sc (UK dc) into the "little gap" of the next triangle as shown by the stitch marker in the photo of Step 5.
Then work Steps 6 - 8 and weave in ends:
 Simple braids for other purposes!
~~~~~
Buttonbraid bracelet photo tutorial
Step 1: *ch 2, 2 sc (UK dc) into 2nd chain from hook*
In this pattern, when working your sc (UK dc) into the chain, insert your hook under the top two loops of the chain stitch.
This makes for much better defined triangles and avoids spaces within the pattern.
Repeat from * to * for pattern, for as long as you want your braid/bracelet to be:
 Step 1: first little triangle made.
~~~~~
Step 2: Check the fit around your wrist.
Work until you have a braid long enough to go around your wrist, plus a little overlap.
If your yarn is quite stretchy, you don't need much overlap:
 Step 2: at the end, check the fit.
~~~~~
Step 3: Now we will make the loop for the button.
My button is quite small, so I'm going to chain 3 - I think that will allow the button through comfortably.
You might have to chain 4 or 5 or more depending on the size of your button:
 Step 3: checking the size of the button to decide how many chain to work!
~~~~~
Step 4: Now make 2 ch more.
Work 2 sc (UK dc) into the 2nd chain from hook.
You can see my three chain for the button loop between the last two little triangles:
 Step 4: the last little "triangle" before the turn.
~~~~~
Step 5: Now we crochet down the other side of our braid.
Skip the triangle you just made and your button loop chain.
Work 1 sc (UK dc) into the little gap on the left of the next triangle.
I have put a stitch marker in the correct spot!
I will henceforth refer to this spot as... "the little gap!"
It's actually the stitch you worked two sc (UK dc) into.
 Step 5: stitch marker shows the "little gap" where we work the stitch.
This is how things should look:
 Now we have made the loop end of the bracelet.
~~~~~
And now we're on the final run! Off we go...
Step 6: *ch 2, 2 sc (UK dc) into 2nd chain from hook, 1 sc (UK dc) into the little gap of the next triangle.*
Repeat from * to * until you reach the last triangle to be worked.
 Step 6: working up the other side.
~~~~~
Step 7: ch 2, 2 sc (UK dc) into 2nd chain from hook.
Now ss to join into your very first stitch at the beginning of your braid next to the slip knot.
I've put a stitch marker into that stitch to show you where to ss.
 Step 7: stitch marker showing you where to join with ss.
~~~~~
Step 8: To make things more secure, slip stitch again into the next stitches, as shown by the stitch marker - or wherever you think is tidiest.
 Step 8: where I ss to fully secure the join.
~~~~~
Step 9: Cut your yarn leaving a tail long enough to sew your button onto this end of your braid.
Weave the yarn tail down to where you aim to sew your button.
 Step 9: weave yarn to the spot where you want your button.
~~~~~
Step 10: Sew on your button and weave both ends of the yarn into the back of your braid.
 Step 10: the button is attached.
~~~~~
And here's your completed Buttonbraid Bracelet! Button on one end, button loop on the other!
You're welcome to join me on Facebook :) See you there!
~~~~~
- Home
- Crochet Jewelry
- Buttonbraid Bracelet