Cosmic Crochet Square
This square uses the pattern from my Cosmic Coaster then adds more rounds to make a larger square or mat.
Choose from a plain edging or a lacy-edged effect:


In the examples above, I've used Lion Brand 24/7 cotton, worsted-weight, with a 4.00 mm/G hook.
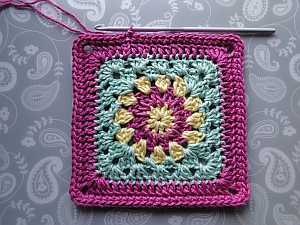
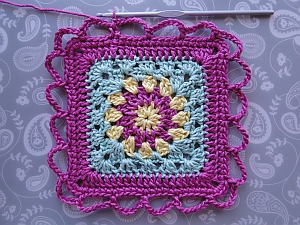
Below is a square worked in size 10 thread with a 1.75 mm hook:
 Lacy edging in size 10 thread, Rounds 6 - 10.
Measures 4¼"/10½ cm wide.
|
|
The pattern is written in US terms, so:
sc = UK dc
dc = UK tr
trc = UK dtr (Round 10 only)
Rounds 1 - 5: Crochet the Cosmic Coaster in any color combo you like. I wrote that pattern for two colors, but I think the larger square is nice with more!
Once you get to the end of Round 5, you'll see the link back to this page to continue with Round 6.
Round 6: I joined into the 1st of the 7 dc on one corner:

ch 3 (counts as a stitch); 1 dc into each of next 2 stitches:

*(3 dc, ch 3, 3 dc) into next stitch (corner.)
1 dc into each of next 15 stitches*
Repeat from * to * 2 times.
 Corner
 Along the edge.
Ending the round: (3 dc, ch 3, 3 dc) into next stitch.
1 dc into each of next 12 stitches; join with a ss into top of 3 ch.
(84 stitches worked.)

Round 7: ch 1, sc into same stitch (the top of your 3 ch)
1 sc into each of next 5 stitches. The first stitch you go into will be a bit tight to see, so make sure you spot it!
*4 sc into 3-ch space;
1 sc into each of next 21 stitches*
Repeat from * to * 2 times.
4 sc into next 3-ch space; 1 sc into each of next 15 stitches.
Join with a ss into 1st sc.
(100 stitches worked!)
If you want to stop here and have a plain edge, then tie off and weave your working end from front to back under the top two loops of the next stitch before weaving into the back.
If you're working the lacy edge, do not tie off- unless you want to change color!
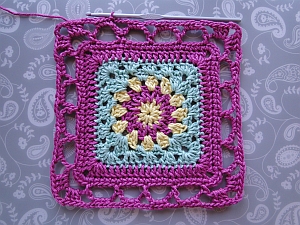
Here I am at the end of Round 7 with the piece I will use for the lacy-edge pix below:
 The end of Round 7.
Either tie off here, or carry on crocheting your lacy edge!
OK, so now we'll continue working Rounds 8 - 10 for that lacy look.
Round 8: ch 1, sc same stitch where you joined.
(ch 7, skip next 4 stitches, sc next stitch) 19 times.
ch 7, skip next 4 stitches, join with a ss into 1st sc:
Round 9: ss into each of 1st 3 chain of 7-chain loop; ch 1, 3 sc into same loop.
ch 3; 3 dc, ch 3, 3 dc into next loop (corner)
*(ch 3, 3 sc into next loop) 4 times;
ch 3; 3 dc, ch 3, 3 dc into next loop*
Repeat from * to * 2 times.
(ch 3, 3 sc into next loop) 3 times; ch 3, join with a ss into 1st sc:
Round 10: In this round, the corners are made with trc = UK dtr :)
ss into next two stitches, ss into next 3-ch loop.
ch 3, 2 dc into same loop.
ch 3, 7 trc into next 3-chain loop (corner)
*(ch 3, 3 dc into next 3-chain loop) 5 times;
ch 3, 7 trc into next 3-chain loop*
Repeat from * to * 2 times
(ch 3, 3 dc into next 3-chain loop) 4 times; ch 3, ss into top of 3 ch.
Tie off, weaving your working end from front to back under the top two loops of the next stitch, before weaving into the back of the piece.
Tip: This square benefits from a press with a gentle iron and a bit of steam, just to settle that lacy edging! It really does make a difference. Check your yarn's ironing instructions!
- I usually iron on the wrong side of the piece so as not to flatten the stitches on the front.
- And I tend not to use the hottest possible when pressing a finished piece, again, to avoid that squashed look :)
~~~~~
- Home
- Crochet Squares
- Cosmic Square