The Bloom Lace Flower
The Bloom Lace Flower has a raised middle and a delicate edging, creating a stunning effect:
 Crocheted in Coats Puppets size 10 thread, with a 1.75 mm hook. Measures one and a half inches/4 cm across.
|
|
This is a more advanced crochet pattern, in that you work a round of stitches, then crochet over that round. Then you work over those two rounds to create the raised look of the flower center.
It's similar to the Irish crochet method of using a padding cord, I suppose, to give that "raised work" look.
The difficulty comes in keeping your stitches and tension even. You need to have good control over what's happening with your yarn and hook.
I would recommend you crochet a test flower first, so that you get the idea of how it works. If you don't like how your stitches look, simply unravel back to where things went a bit wrong, and rework.
You'll need:
- your chosen yarn and hook
- a stitch marker (or a contrasting piece of thread)
Oh, and I've added an alternative "petal" edging below if you'd like to try that!
You can make any size of flower, starting with the length of chain of
your choice.
You can work as many stitches as look good to you in each round, too!
In my basic pattern and photo tutorial below I give you my stitch counts, but you don't have to stick rigidly to them.
The most important thing is that your flower blooms beautifully :)
So you can either
- follow the basic pattern just below that you can use for varying sizes of flower. You can also see a pic of each round showing my flower crocheted into a ring of 7 chain. For that example I used Debbie Bliss Eco Baby, a sports-weight yarn, and my favorite 3 mm hook :)
- or skip down to my step-by-step photo tutorial to make the flower pictured at the top of the page which uses an 8 chain ring.
This basic pattern and the tutorial below are written in US terms - but the UK version of the stitches is written in brackets :)
The Basic Pattern
Round 1: Starting with a slip knot, work a length of chain - the minimum is 5 ch (not recommended to start with, and the flower ends up with a tiny hole in the middle.)
I've used a 7 ch ring for my Basic Pattern flower here, but you could go bigger.
Join into 1st ch with a ss to make a ring.
Ch 1. Work sc (UK dc) around the ring, as many as fit comfortably. Work over your tail end as you go.
Join into 1st stitch with a ss:
 7 ch joined to make a ring. 12 sc (UK dc) into the ring and joined with a ss.
Round 2: Do not work a chain. Work sc (UK dc) over the stitches of the first round, working into the center of the ring as before. Work over your tail end again.
I worked 18 stitches here.
You can stitch mark the first stitch to keep track - I always do, or I get a bit lost ;)
Once you're done, join into 1st stitch with a ss. Snip your tail end neatly so that it disappears into the back of the work:
 Without making any chain, I crocheted 18 sc (UK dc) around, working over the stitches of the first round.
Round 3: Ch 1. Work dc (UK tr) into the ring, over your previous stitches.
I stitch mark the 2nd stitch as we will work our joining ss into that stitch at the end.
I crocheted 25 stitches here, but you can work as many stitches as needed, keeping them even.
Join into 2nd dc (UK tr) with a ss:
 I worked 1 ch. Then 25 dc (UK tr) fitted nicely around, and I joined with a ss into the 2nd stitch.
Round 4: Work neat, even-sized chain for this round.
Ch 4, sc (UK dc) into next stitch. *Ch3, sc (UK dc) into next stitch*
Repeat from * to * around, finishing with ch 3 and a ss into the joining ss from the last round.
Tie off and weave end into back - more details on weaving in below.
 The edging is done, finishing with ch 3 and a ss into the joining ss of the last round.
The Bloom Lace Flower Pattern - Photo Tutorial
Round 1
Start with a slip knot. Ch 8, ss into 8th ch from hook with a ss to form a ring:

Ch 1, 14 sc (UK dc) into ring. Work your stitches over the starting tail end as you go round.
(Do keep in mind, as I said above, that you don't have to stick rigidly to my stitch counts. If you need to add an extra stitch/work less stitches to make your circle neat, that's fine.)
Join into 1st sc (UK dc) with a ss:

Round 2
Do not make any chain.
Working over the stitches of
round 1, work 20 sc (UK dc) into the center of the ring.
Keep your stitches relaxed but even, letting the yarn set its own tension, so to speak.
Again, work over your starting tail end.
I find that the
tighter I work, the more difficult it is to fit the 20 stitches into the
round. So hold the piece lightly and take your time ;)
Join into 1st stitch with a ss:

Cut your starting tail end. Don't cut your working yarn by mistake!
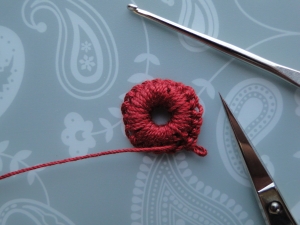
Round 3
Ch 1. Working into the ring and over your stitches in the first two rounds, make 2 dc (UK tr.)
Stitch mark the 2nd dc (UK tr):

Then work 26 more dc (UK tr) into the ring, again keeping your stitches even.
As you work, your stitches should be lying next to each other, radiating out from the center. When making your next stitch, point your crochet hook down into the ring next to the stitch you just made and check that the yarn going over edge at the top is lying next to the previous stitch:

Join with a ss into the 2nd dc (UK tr) which is stitch marked. If you like, stitch mark your ss as we will join into this stitch at the end of the next round.
The stitch marker also keeps this stitch a little more open, so that it's easier to get your hook into it later, which is fine as far as I'm concerned!
Here's where we are so far:

Round 4
Ch 4, miss 1st stitch you have just slip-stitched into, sc (UK dc) into next st:

*Ch 3, sc (UK dc) into next st*

Repeat from * to * around, finishing with ch 3 and ss into joining ss:

Weaving in your tail end
Tie off and gently tighten the knot.
Thread your tail end through the back loop of the first 3 ch loop you made:

Then weave it down towards the center:

Weave it in around the center to secure and snip the end:

And congratulations, you did it! See how the sun came out as I took my pics :) And I made one in white, too:


~~~~~
Petal Edging
Now, here's an alternative edging I dreamed up, and I made this one in thread:

I worked exactly as above: make a 7-chain ring, ch 1, 12 sc (UK dc) in ring, ss join, 18 sc (UK dc) over those sts, ss join, ch 1, 25 dc (UK tr) over both rounds into the middle, ss join into second dc (UK tr) worked = 24 sts.
Then:
ch 1, sc (UK dc) into same st
(5 dc (UK tr) into next st, sc (UK dc) into each of next 2 sts) 7 times
8th petal: 5 dc (UK tr) into next st, sc (UK dc) into next st, ss into joining ss from end of last round.
~~~~~
Here's a similar pattern that you might also enjoy:

- Home
- Flower Patterns
- Bloom Lace Flower